How I made a Bartop Arcade
Translated version: English Italiano
TL;DR: Images and sources of my Bartop Arcade.
Those who know me know that in these past months I’ve been finishing my Bartop: an Arcade Cabinet large enough to house the monitor and the control panel (without the coin box).
Main features are:
- Wood cabinet;
- 17″ LCD Monitor;
- Stereo speakers;
- LED backlit Marquee;
- Panel control for 2 players.
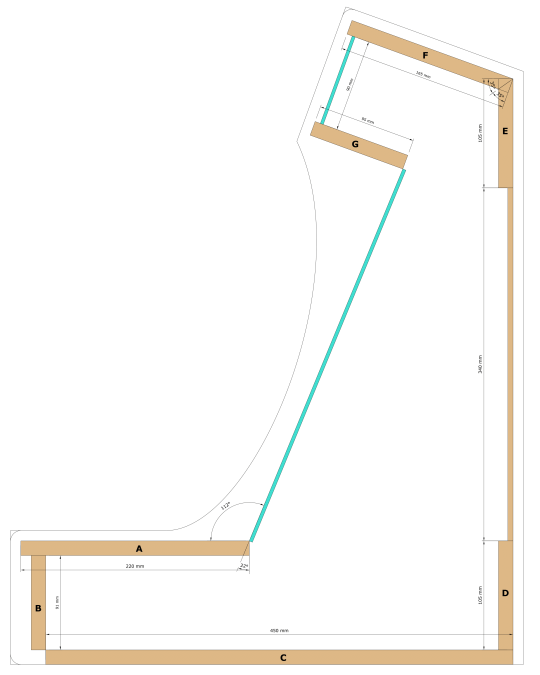
For the cabinet design I’ve used Sketchup: I had to learn it by myself taking into account all the issues concerning cutting and measuring the wood.
I’m neither a do-it-yourself expert nor a woodworker, so I’ve done a lot of feasibility study: my dad was a great help.
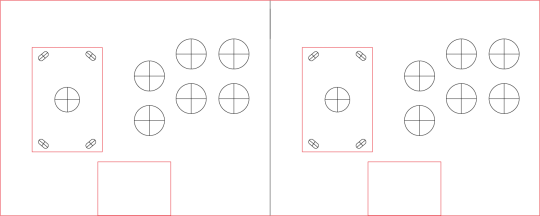
After the cabinet design, it’s time for the control panel: it hosts 2 joystick and 12 buttons in the top part, leaving free space for 4 buttons (Player 1, Coin 1, Player 2 e Coin 2) in the bottom part.
To make it I’ve used Adobe Illustrator because it’s a tool I’m familiar with and it permits to use millimeters as a measure unit.
As you can see, the panel control (A and B) can be opened to allow maintenance work, same for the rear door (between D and E).
Now it’s time of hardware parts, here’s the shopping list:
- Raspberry Pi 3 (42 €);
- I-PAC 2 (53 €);
- 2 x Seimitsu LS-32 Arcade Joystick (with switch D44X Cherry – 4.8mm) including screws (35 €);
- 2 x Seimitsu LS-32 Shaft Extender (5 €);
- 12 x Happ Competition Arcade Button (with switch D44X Cherry – 4.8mm) (40 €);
- 2 x Happ Concave Arcade Start Button (with switch D44X Cherry – 4.8mm) (8 €);
- 2 x Happ Standard Arcade Button (with switch D44X Cherry – 4.8mm) (6 €);
- 100 cm LED strip (12 €);
- Trust Leto stereo speakers (10 €).
I received a used 17″ LCD Monitor for free (I had to buy an HDMI-DVI for 8 €) and the wood (14mm Poplar plywood) cost me about 50 € (a 80cm x 80cm panel and a 150cm x 50cm panel).
Outsideprint is the site I’ve used for the glass decal: easy to use, fast and with great support.
It was obvious for me to use a Raspberry Pi but I can’t say the same thing for the I-PAC 2: connecting the controls wires (joystick and buttons) directly to the GPIO of Raspberry goes against the modularity principle (a must for me).
The IPAC 2 “transforms” the control panel into a keyboard so I can extend the hardware (regarding the Raspberry and the controls) easily without headaches.
Now it’s time to share some photos of the bartop (finished and during the construction):
IMPORTANT: If you are interested in making a Bartop, I created a Git repo with all the sources under the MIT license.
This post contains just the essentials info , otherwise it would have been a wall of text.
I thank Arcade Italia for showing me the right way, Retropie for the great software shared to the community and last but not least my dad.
Insert coin…
Awesome! I’m going to try to make one of these this summer. Thanks for the plans!
Za duże to, kto to będzie trzymał w domu? nie ma gdzie postawić bo nie ma nóżek.
Moim zdaniem panel z jaistickami i klawiszami powinien byc odkładany, ekran też powinien byc ruchomy. Do tego automat wrzutowy, bez tego to słabo wygląda.